|
||||||||||||
|
|
|
NASA Apollo Missions
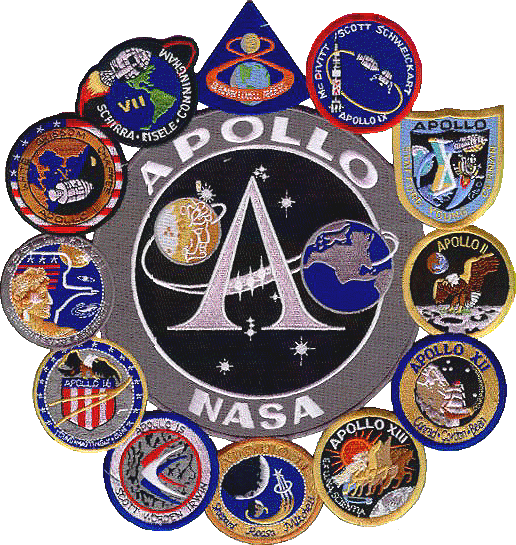
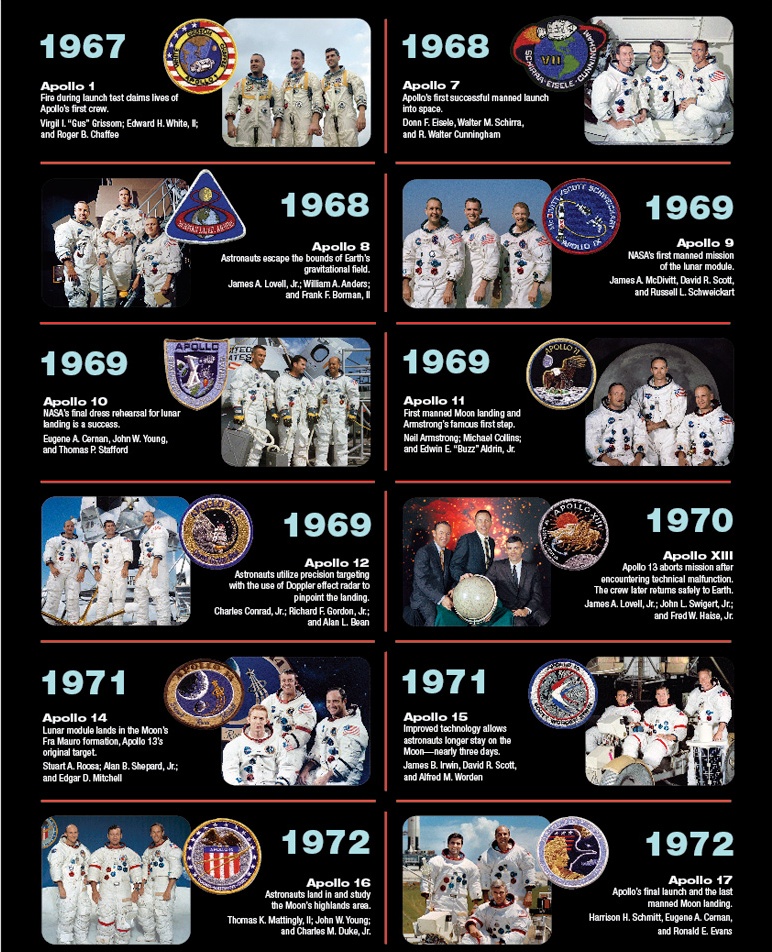
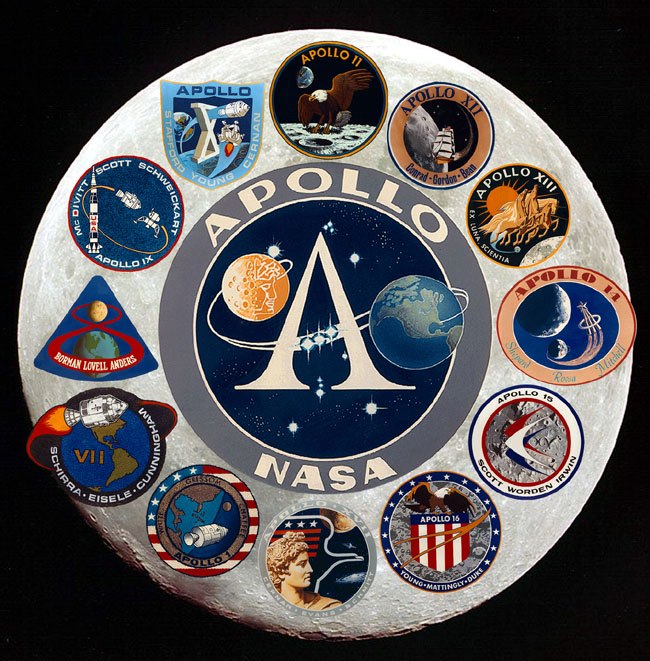
The Apollo program included a large number of uncrewed test missions and 12 crewed missions: three Earth orbiting missions (Apollo 7, 9 and Apollo-Soyuz), two lunar orbiting missions (Apollo 8 and 10), a lunar swingby (Apollo 13), and six Moon landing missions (Apollo 11, 12, 14, 15, 16, and 17). Two astronauts from each of these six missions walked on the Moon (Neil Armstrong, Edwin Aldrin, Charles Conrad, Alan Bean, Alan Shepard, Edgar Mitchell, David Scott, James Irwin, John Young, Charles Duke, Gene Cernan, and Harrison Schmitt), the only humans to have set foot on another solar system body. Total funding for the Apollo program was approximately $20,443,600,000.
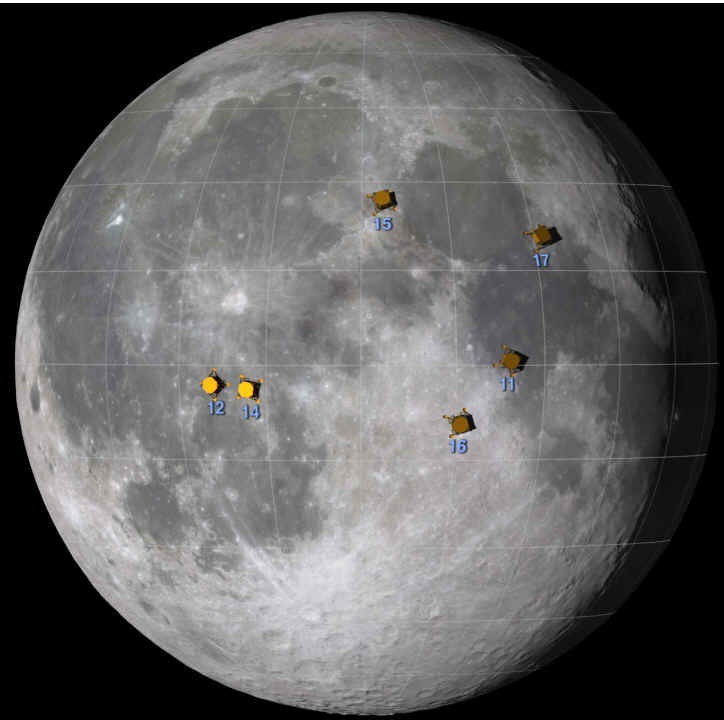
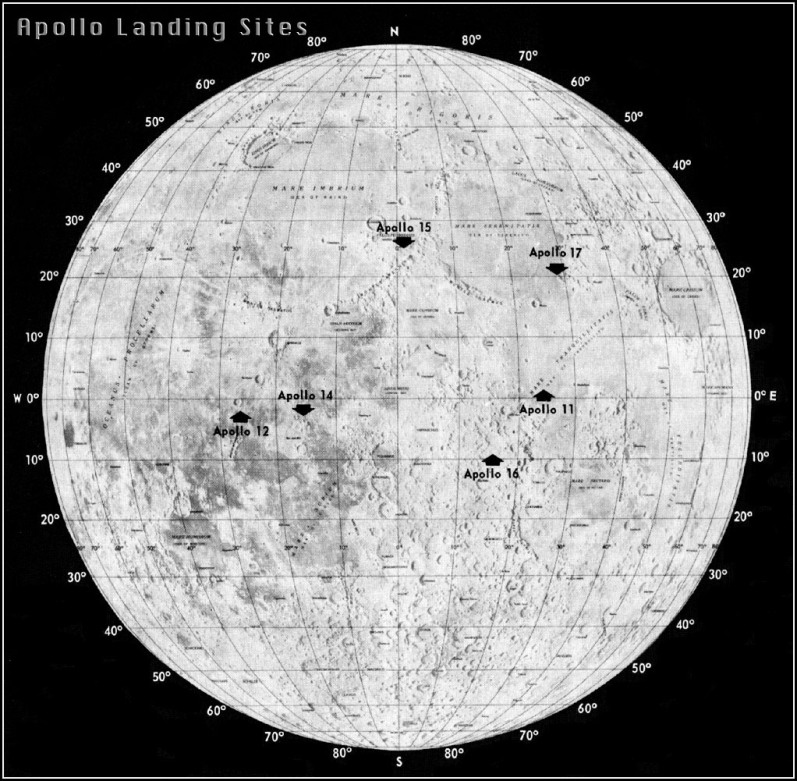
This graphic shows the
approximate locations of the Apollo moon landing sites.
Lunar Missions
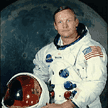
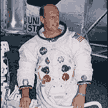
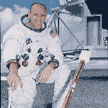
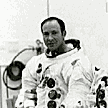
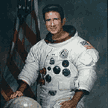
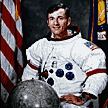
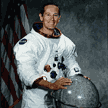
The 12 Astronauts That Have Walked on the Moon
Of the billions and billions of people that have walked on the Earth, only a select 12 have walked on the Moon
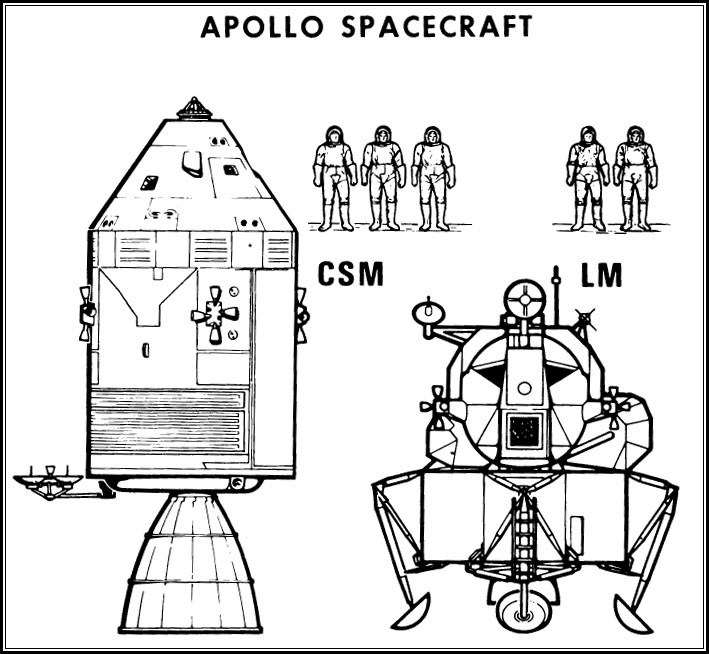
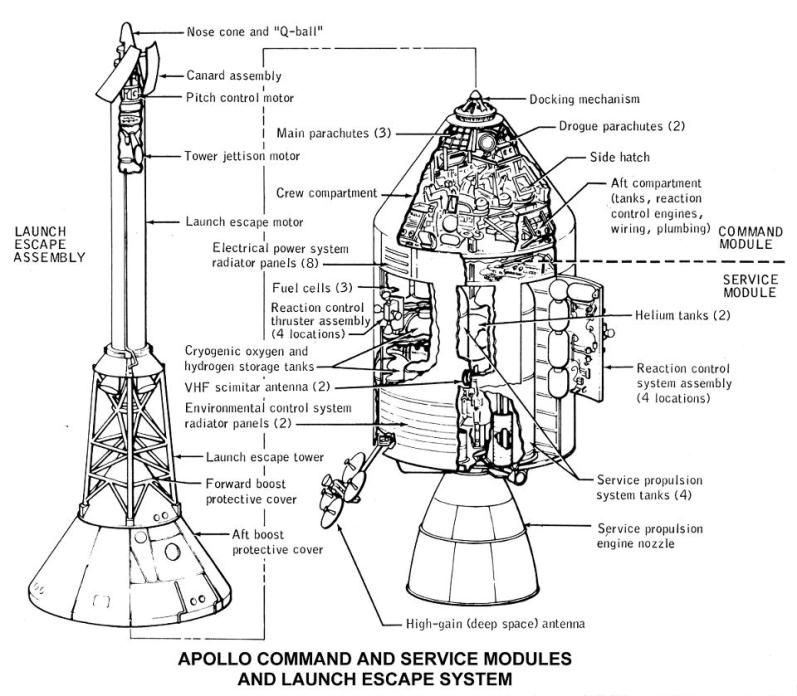
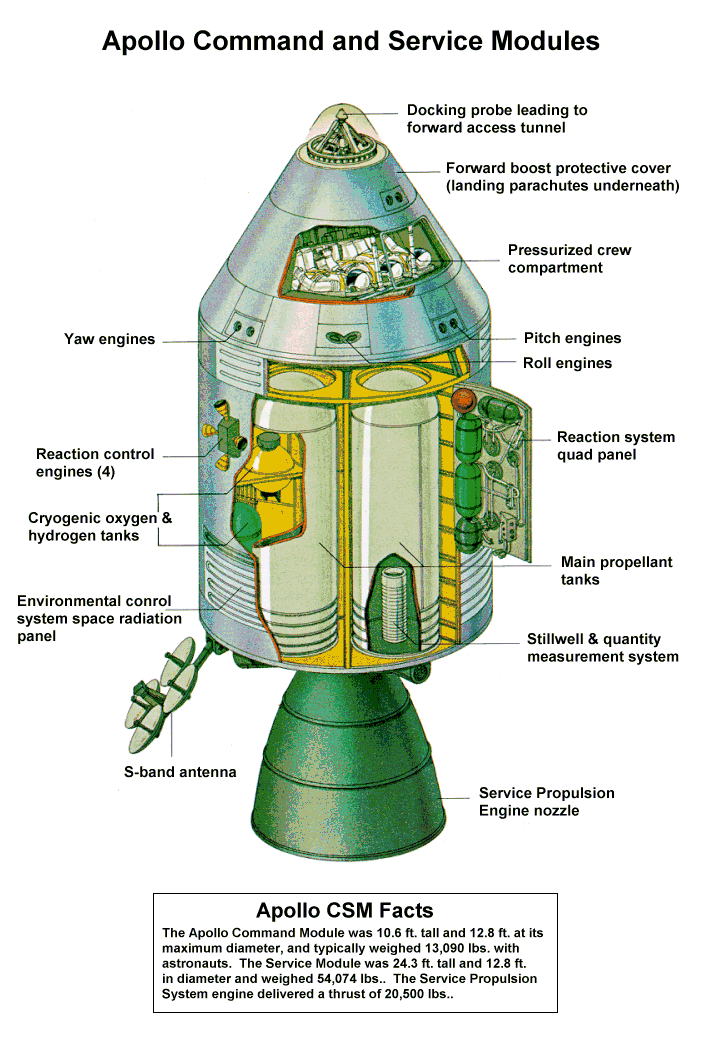
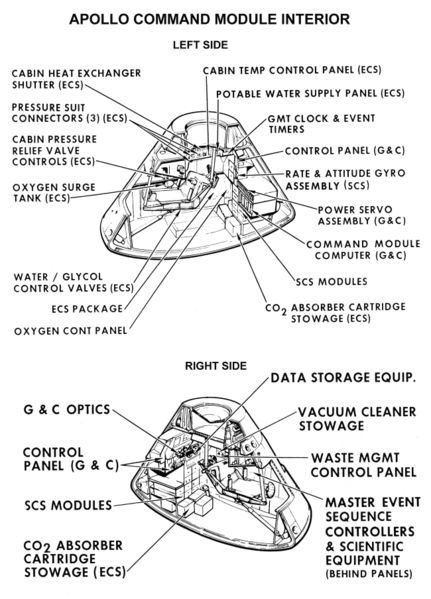
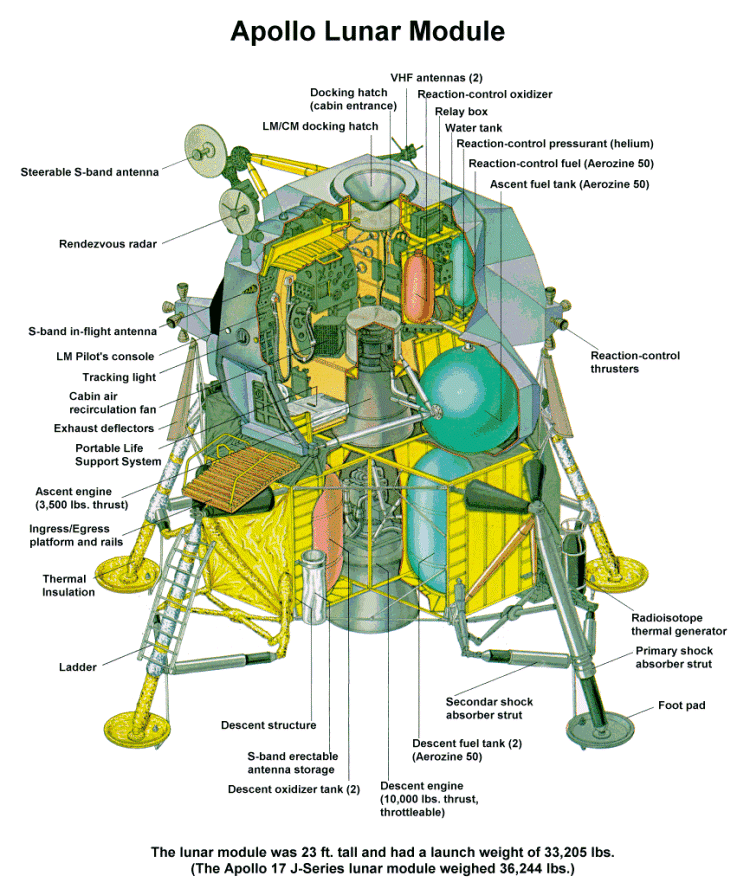
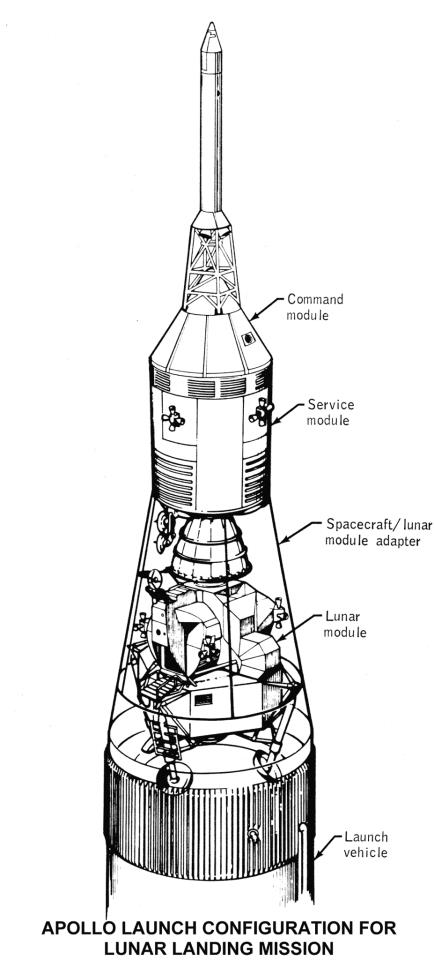
Apollo Command and Service Modules The Apollo mission consisted of a Command Module (CM) and a Lunar Module (LM). The CM and LM would separate after lunar orbit insertion. One crew member would stay in the CM, which would orbit the Moon, while the other two astronauts would take the LM down to the lunar surface. After exploring the surface, setting up experiments, taking pictures, collecting rock samples, etc., the astronauts would return to the CM for the journey back to Earth. Spacecraft and Subsystems As the name implies, the Command and Service Module (CSM) was comprised of two distinct units: the Command Module (CM), which housed the crew, spacecraft operations systems, and re-entry equipment, and the Service Module (SM) which carried most of the consumables (oxygen, water, helium, fuel cells, and fuel) and the main propulsion system. The total length of the two modules attached was 11.0 meters with a maximum diameter of 3.9 meters. Block II CSM's were used for all the crewed Apollo missions. The Apollo 11 CSM mass of 28,801 kg was the launch mass including propellants and expendables, of this the Command Module (CM 107) had a mass of 5557 kg and the Service Module (SM 107) 23,244 kg. Telecommunications included voice, television, data, and tracking and ranging subsystems for communications between astronauts, CM, LM, and Earth. Voice contact was provided by an S-band uplink and downlink system. Tracking was done through a unified S-band transponder. A high gain steerable S-band antenna consisting of four 79-cm diameter parabolic dishes was mounted on a folding boom at the aft end of the SM. Two VHF scimitar antennas were also mounted on the SM. There was also a VHF recovery beacon mounted in the CM. The CSM environmental control system regulated cabin atmosphere, pressure, temperature, carbon dioxide, odors, particles, and ventilation and controlled the temperature range of the electronic equipment. Command Module The CM was a conical pressure vessel with a maximum diameter of 3.9 m at its base and a height of 3.65 m. It was made of an aluminum honeycomb sandwhich bonded between sheet aluminum alloy. The base of the CM consisted of a heat shield made of brazed stainless steel honeycomb filled with a phenolic epoxy resin as an ablative material and varied in thickness from 1.8 to 6.9 cm. At the tip of the cone was a hatch and docking assembly designed to mate with the lunar module. The CM was divided into three compartments. The forward compartment in the nose of the cone held the three 25.4 m diameter main parachutes, two 5 m drogue parachutes, and pilot mortar chutes for Earth landing. The aft compartment was situated around the base of the CM and contained propellant tanks, reaction control engines, wiring, and plumbing. The crew compartment comprised most of the volume of the CM, approximately 6.17 cubic meters of space. Three astronaut couches were lined up facing forward in the center of the compartment. A large access hatch was situated above the center couch. A short access tunnel led to the docking hatch in the CM nose. The crew compartment held the controls, displays, navigation equipment and other systems used by the astronauts. The CM had five windows: one in the access hatch, one next to each astronaut in the two outer seats, and two forward-facing rendezvous windows. Five silver/zinc-oxide batteries provided power after the CM and SM detached, three for re-entry and after landing and two for vehicle separation and parachute deployment. The CM had twelve 420 N nitrogen tetroxide/hydrazine reaction control thrusters. The CM provided the re-entry capability at the end of the mission after separation from the Service Module. Service Module The SM was a cylinder 3.9 meters in diameter and 7.6 m long which was attached to the back of the CM. The outer skin of the SM was formed of 2.5 cm thick aluminum honeycomb panels. The interior was divided by milled aluminum radial beams into six sections around a central cylinder. At the back of the SM mounted in the central cylinder was a gimbal mounted re-startable hypergolic liquid propellant 91,000 N engine and cone shaped engine nozzle. Attitude control was provided by four identical banks of four 450 N reaction control thrusters each spaced 90 degrees apart around the forward part of the SM. The six sections of the SM held three 31-cell hydrogen oxygen fuel cells which provided 28 volts, two cryogenic oxygen and two cryogenic hydrogen tanks, four tanks for the main propulsion engine, two for fuel and two for oxidizer, and the subsystems the main propulsion unit. Two helium tanks were mounted in the central cylinder. Environmental control radiator panels were spaced around the top of the cylinder and electrical power system radiators near the bottom.
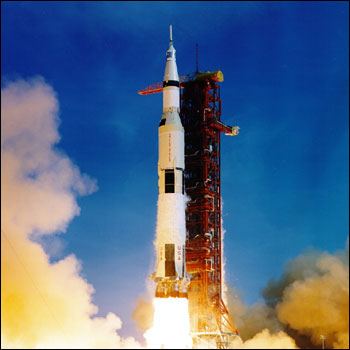
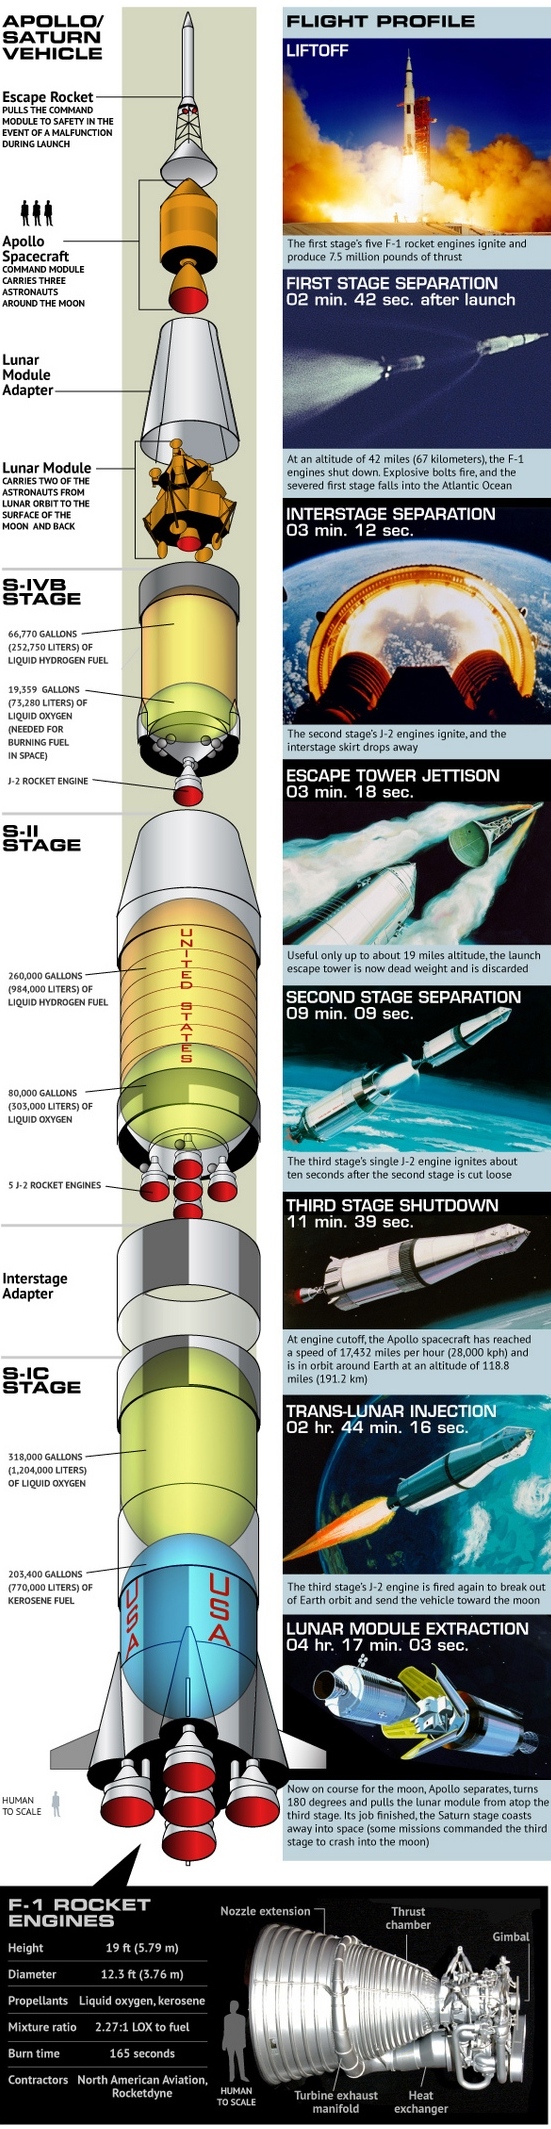
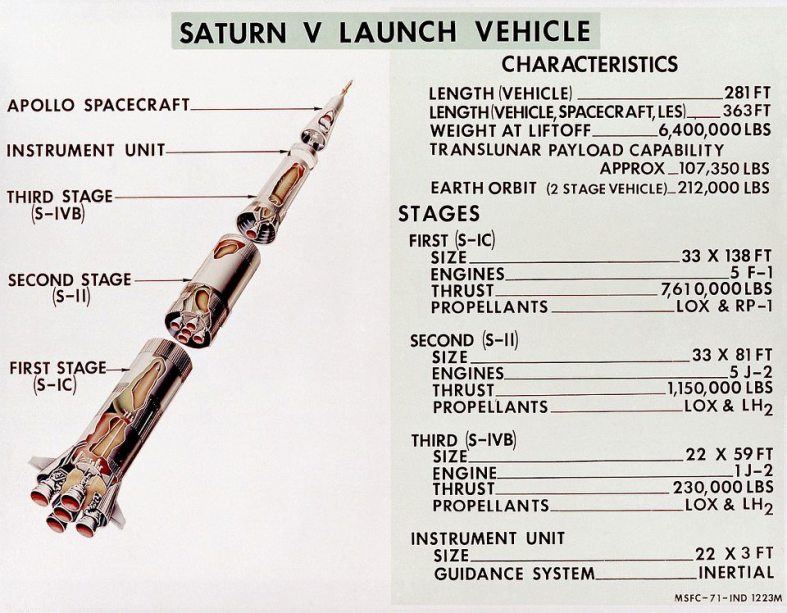
The Saturn V was a
rocket NASA built to send people to the moon. (The V in the name is the Roman
numeral five.) The Saturn V was a type of rocket called a Heavy Lift Vehicle.
That means it was very powerful. It was the most powerful rocket that had ever
flown successfully. The Saturn V was used in the Apollo program in the 1960s and
1970s. It also was used to launch the Skylab space station.
The Saturn V rocket was 111 meters (363 feet) tall, about the height of a 36-story-tall building, and 18 meters (60 feet) taller than the Statue of Liberty. Fully fueled for liftoff, the Saturn V weighed 2.8 million kilograms (6.2 million pounds), the weight of about 400 elephants. The rocket generated 34.5 million newtons (7.6 million pounds) of thrust at launch, creating more power than 85 Hoover Dams. A car that gets 48 kilometers (30 miles) to the gallon could drive around the world around 800 times with the amount of fuel the Saturn V used for a lunar landing mission. It could launch about 118,000 kilograms (130 tons) into Earth orbit. That's about as much weight as 10 school buses. The Saturn V could launch about 43,500 kilograms (50 tons) to the moon. That's about the same as four school buses.
The Saturn V was
developed at NASA's Marshall Space Flight Center in Huntsville, Ala. It was one
of three types of Saturn rockets NASA built. Two smaller rockets, the Saturn I
(1) and IB (1b), were used to launch humans into Earth orbit. The Saturn V sent
them beyond Earth orbit to the moon. The first Saturn V was launched in 1967. It
was called Apollo 4. Apollo 6 followed in 1968. Both of these rockets were
launched without crews. These launches tested the Saturn V rocket.
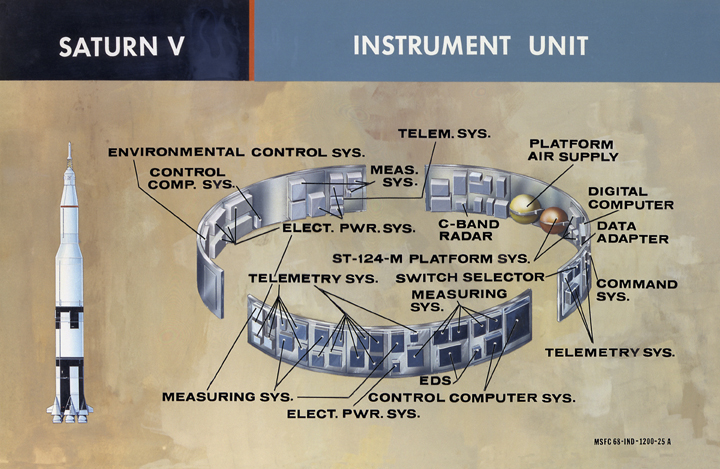
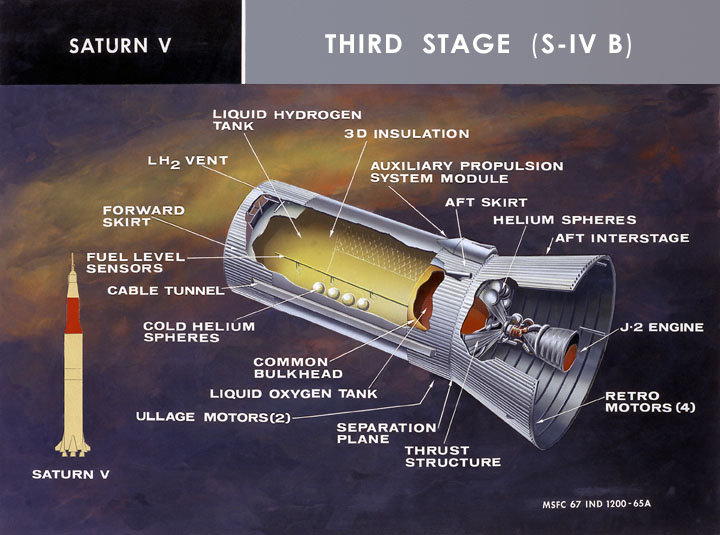
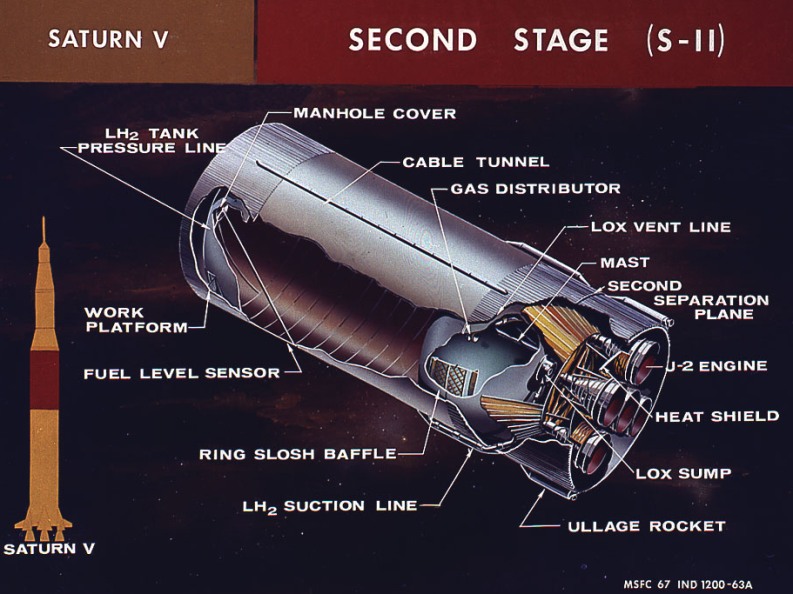
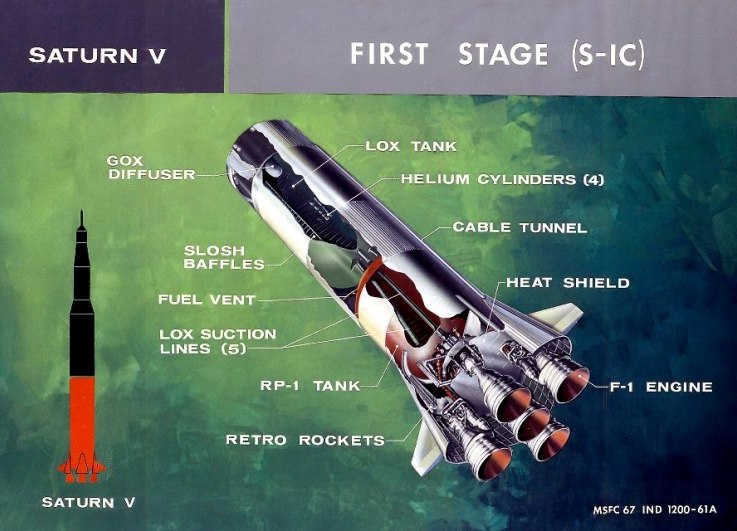
The Saturn V
rockets used for the Apollo missions had three stages. Each stage would
burn its engines until it was out of fuel and would then separate from the
rocket. The engines on the next stage would fire, and the rocket would
continue into space. The first stage had the most powerful engines, since
it had the challenging task of lifting the fully fueled rocket off the
ground. The first stage lifted the rocket to an altitude of about 68
kilometers (42 miles). The second stage carried it from there almost into
orbit. The third stage placed the Apollo spacecraft into Earth orbit and
pushed it toward the moon. The first two stages fell into the ocean after
separation. The third stage either stayed in space or hit the moon.
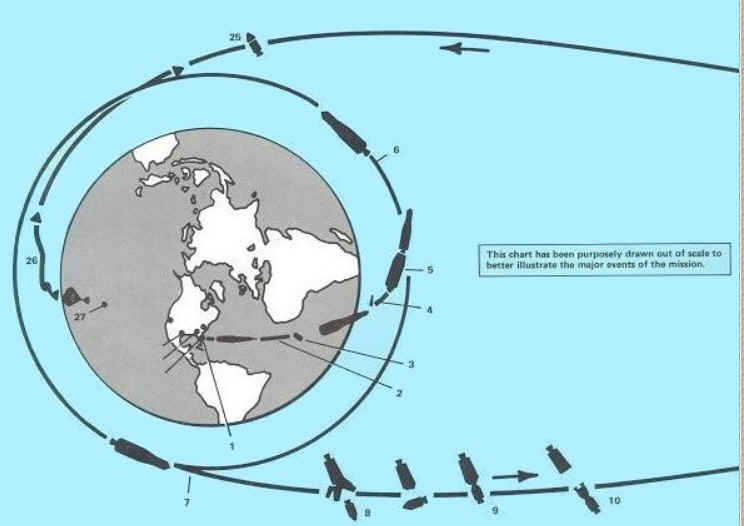
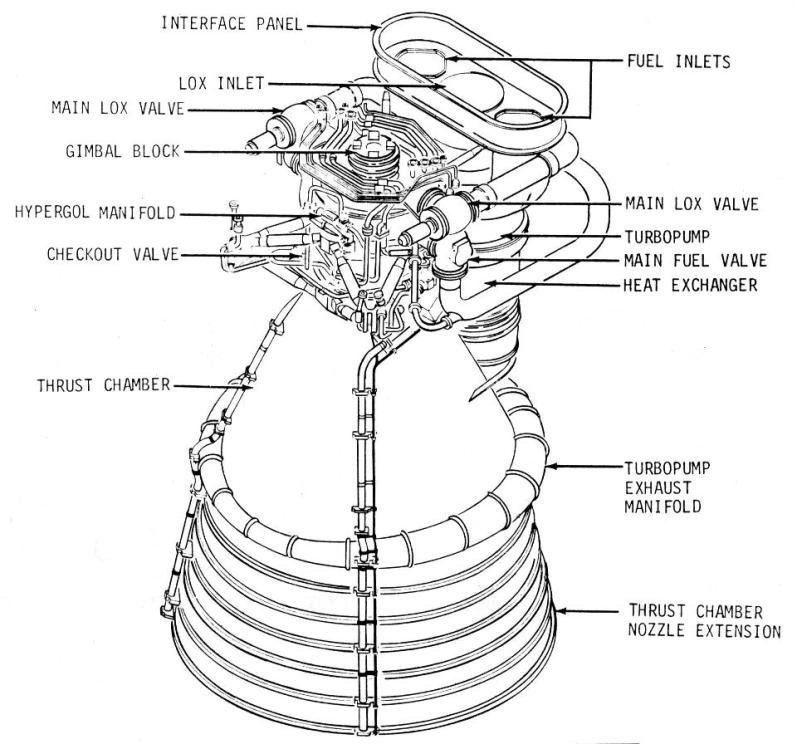
The Saturn V F-1 Engine ignition sequence
A large combustion chamber and bell have an injector plate at the top, through which RP-1 fuel and LOX are injected at high pressure. Above the injector is the LOX dome which also transmits the force of the thrust from the engine to the rocket's structure. A single-shaft turbopump is mounted beside the combustion chamber. The turbine is at the bottom and is driven by the exhaust gas from burning RP-1 and LOX in a fuel-rich mixture in a gas generator. After powering the turbine, the exhaust gases pass through a heat exchanger, then to a wrap-around exhaust manifold which feeds it into the periphery of the engine bell. The final task for these hot gases is to cool and protect the nozzle extension from the far hotter exhaust of the main engine itself. Above the turbine, on the same shaft, is the fuel pump with two inlets from the fuel tank and two outlets going, via shut-off valves, to the injector plate. A line from one of these 'feeds' supplies the gas generator with fuel. Fuel is also used within the engine as a lubricant and as a hydraulic working fluid, though before launch, RJ-1 ramjet fuel is supplied from the ground for this purpose. At the top of the turbopump shaft is the LOX pump with a single, large inlet in-line with the turboshaft axis. This pump also has two outlet lines, with valves, to feed the injector plate. One line also supplies LOX to the gas generator. The interior lining of the combustion chamber and engine bell consists of a myriad of pipework through which a large portion of the fuel supply is fed. This cools the chamber and bell structure while also pre-warming the fuel. Lastly, an igniter,
containing a cartridge of hypergolic fluid with burst diaphragms at either
end, is in the high pressure fuel circuit and has its own inject point in
the combustion chamber. This fluid is triethylboron with 10-15%
triethylaluminium. At T minus 8.9 seconds, a signal from the automatic sequencer fires four pyrotechnic devices. Two of them cause the fuel-rich turbine exhaust gas to ignite when it enters the engine bell. Another begins combustion within the gas generator while the fourth ignites the exhaust from the turbine. Links are burned away by these igniters to generate an electrical signal to move the start solenoid. The start solenoid directs hydraulic pressure from the ground supply to open the main LOX valves. LOX begins to flow through the LOX pump, starting it to rotate, then into the combustion chamber. The opening of both LOX valves also causes a valve to allow fuel and LOX into the gas generator, where they ignite and accelerate the turbine. Fuel and LOX pressures rise
as the turbine gains speed. The fuel-rich exhaust from the gas generator
ignites in the engine bell to prevent backfiring and burping of the
engine. The increasing pressure in the fuel lines opens a valve, the
igniter fuel valve, letting fuel pressure reach the hypergol cartridge
which promptly ruptures. Hypergolic fluid, followed
by fuel, enters the chamber through its port where it spontaneously
ignites on contact with the LOX already in the chamber. Rising combustion-induced pressure on the injector plate actuates the ignition monitor valve, directing hydraulic fluid to open the main fuel valves. These are the valves in the fuel lines between the turbopump and the injector plate. The fuel flushes out ethylene glycol which had been preloaded into the cooling pipework around the combustion chamber and nozzle. The heavy load of ethylene glycol mixed with the first injection of fuel slows the build-up of thrust, giving a gentler start. Fluid pressure through
calibrated orifices completes the opening of the fuel valves and fuel
enters the combustion chamber where it burns in the already flaming gases.
The exact time that the main fuel valves open is sequenced across the five
engines to spread the rise in applied force that the structure of the
rocket must withstand. The thrust [rises] during the start-up of each engine. It takes two seconds for full performance to be attained on all engines once the first has begun increasing. The engines are started in a staggered 1-2-2 sequence so that the rocket's structure would be spared a single large load increase, with the centre engine being the first to start. The outboard engines
exhibit a hiccup in their build-up due to the ingestion of helium from the
pogo suppression system installed in each one. The centre engine does not
have this installed. As the flow of fuel and LOX rises to maximum, the chamber pressure, and therefore thrust, is monitored to confirm that the required force has been achieved. With the turbopump at full speed, fuel pressure exceeds hydraulic pressure supplied from ground equipment. Check valves switch the engine's hydraulic supply to be fed from the rocket's fuel instead of from the ground. Credit NASA |
||||||||||||||||||||||||||||||||||||||||||||||||||||||||||||||||||||||||||||||||||||||||||||||||||||||||||||||||||||||||||||||||||||||||||||||||||||||||||||||||||||||||||||||||||||||||||||||||||||||||||||||||||||||||||||||||||||||||||||||||||||||||||||||||||||||||||||||||||||||||||||||||||||||||||||||||||||||||||||||||||||||||||||||||||||||||||||||||||||||||||||||||||||||||||||||||||||||||||||||||||||||||||||||||||||||||||